
Go SDK 设计和实现
本章节来自于极客时间的《Go 语言项目开发实战》专栏。
你好,我是孔令飞。
上一讲,我介绍了公有云厂商普遍采用的 SDK 设计方式。其实,还有一些比较优秀的 SDK 设计方式,比如 Kubernetes 的 client-go SDK 设计方式。IAM 项目参考 client-go,也实现了 client-go 风格的 SDK:marmotedu-sdk-go。
和 33 讲 介绍的 SDK 设计方式相比,client-go 风格的 SDK 具有以下优点:
- 大量使用了 Go interface 特性,将接口的定义和实现解耦,可以支持多种实现方式。
- 接口调用层级跟资源的层级相匹配,调用方式更加友好。
- 多版本共存。
所以,我更推荐你使用 marmotedu-sdk-go。接下来,我们就来看下 marmotedu-sdk-go 是如何设计和实现的。
marmotedu-sdk-go 设计
和 medu-sdk-go 相比,marmotedu-sdk-go 的设计和实现要复杂一些,但功能更强大,使用体验也更好。
这里,我们先来看一个使用 SDK 调用 iam-authz-server /v1/authz 接口的示例,代码保存在 marmotedu-sdk-go/examples/authz_clientset/main.go文件中:
package main

import (
	"context"
	"flag"
	"fmt"
	"path/filepath"

	"github.com/ory/ladon"

	metav1 "github.com/marmotedu/component-base/pkg/meta/v1"
	"github.com/marmotedu/component-base/pkg/util/homedir"

	"github.com/marmotedu/marmotedu-sdk-go/marmotedu"
	"github.com/marmotedu/marmotedu-sdk-go/tools/clientcmd"
)

func main() {
	var iamconfig *string
	if home := homedir.HomeDir(); home != "",{
		iamconfig = flag.String(
			"iamconfig",
			filepath.Join(home, ".iam", "config"),
			"(optional) absolute path to the iamconfig file",
		)
	} else {
		iamconfig = flag.String("iamconfig", "", "absolute path to the iamconfig file")
	}
	flag.Parse()

	// use the current context in iamconfig
	config, err := clientcmd.BuildConfigFromFlags("", *iamconfig)
	if err != nil {
		panic(err.Error())
	}

	// create the clientset
	clientset, err := marmotedu.NewForConfig(config)
	if err != nil {
		panic(err.Error())
	}

	request := &ladon.Request{
		Resource: "resources:articles:ladon-introduction",
		Action:   "delete",
		Subject:  "users:peter",
		Context: ladon.Context{
			"remoteIP": "192.168.0.5",
		},
	}

	// Authorize the request
	fmt.Println("Authorize request...")
	ret, err := clientset.Iam().AuthzV1().Authz().Authorize(context.TODO(), request, metav1.AuthorizeOptions{})
	if err != nil {
		panic(err.Error())
	}

	fmt.Printf("Authorize response: %s.\n", ret.ToString())
}在上面的代码示例中,包含了下面的操作。
- 首先,调用
BuildConfigFromFlags函数,创建出 SDK 的配置实例 config; - 接着,调用
marmotedu.NewForConfig(config)创建了 IAM 项目的客户端clientset; - 最后,调用以下代码请求
/v1/authz接口执行资源授权请求:
ret, err := clientset.Iam().AuthzV1().Authz().Authorize(context.TODO(), request, metav1.AuthorizeOptions{})
if err != nil {
    panic(err.Error())
}

fmt.Printf("Authorize response: %s.\n", ret.ToString())调用格式为项目客户端.应用客户端.服务客户端.资源名.接口 。
所以,上面的代码通过创建项目级别的客户端、应用级别的客户端和服务级别的客户端,来调用资源的 API 接口。接下来,我们来看下如何创建这些客户端。
marmotedu-sdk-go 客户端设计
在讲客户端创建之前,我们先来看下客户端的设计思路。
Go 项目的组织方式是有层级的:Project -> Application -> Service。marmotedu-sdk-go 很好地体现了这种层级关系,使得 SDK 的调用更加易懂、易用。marmotedu-sdk-go 的层级关系如下图所示:
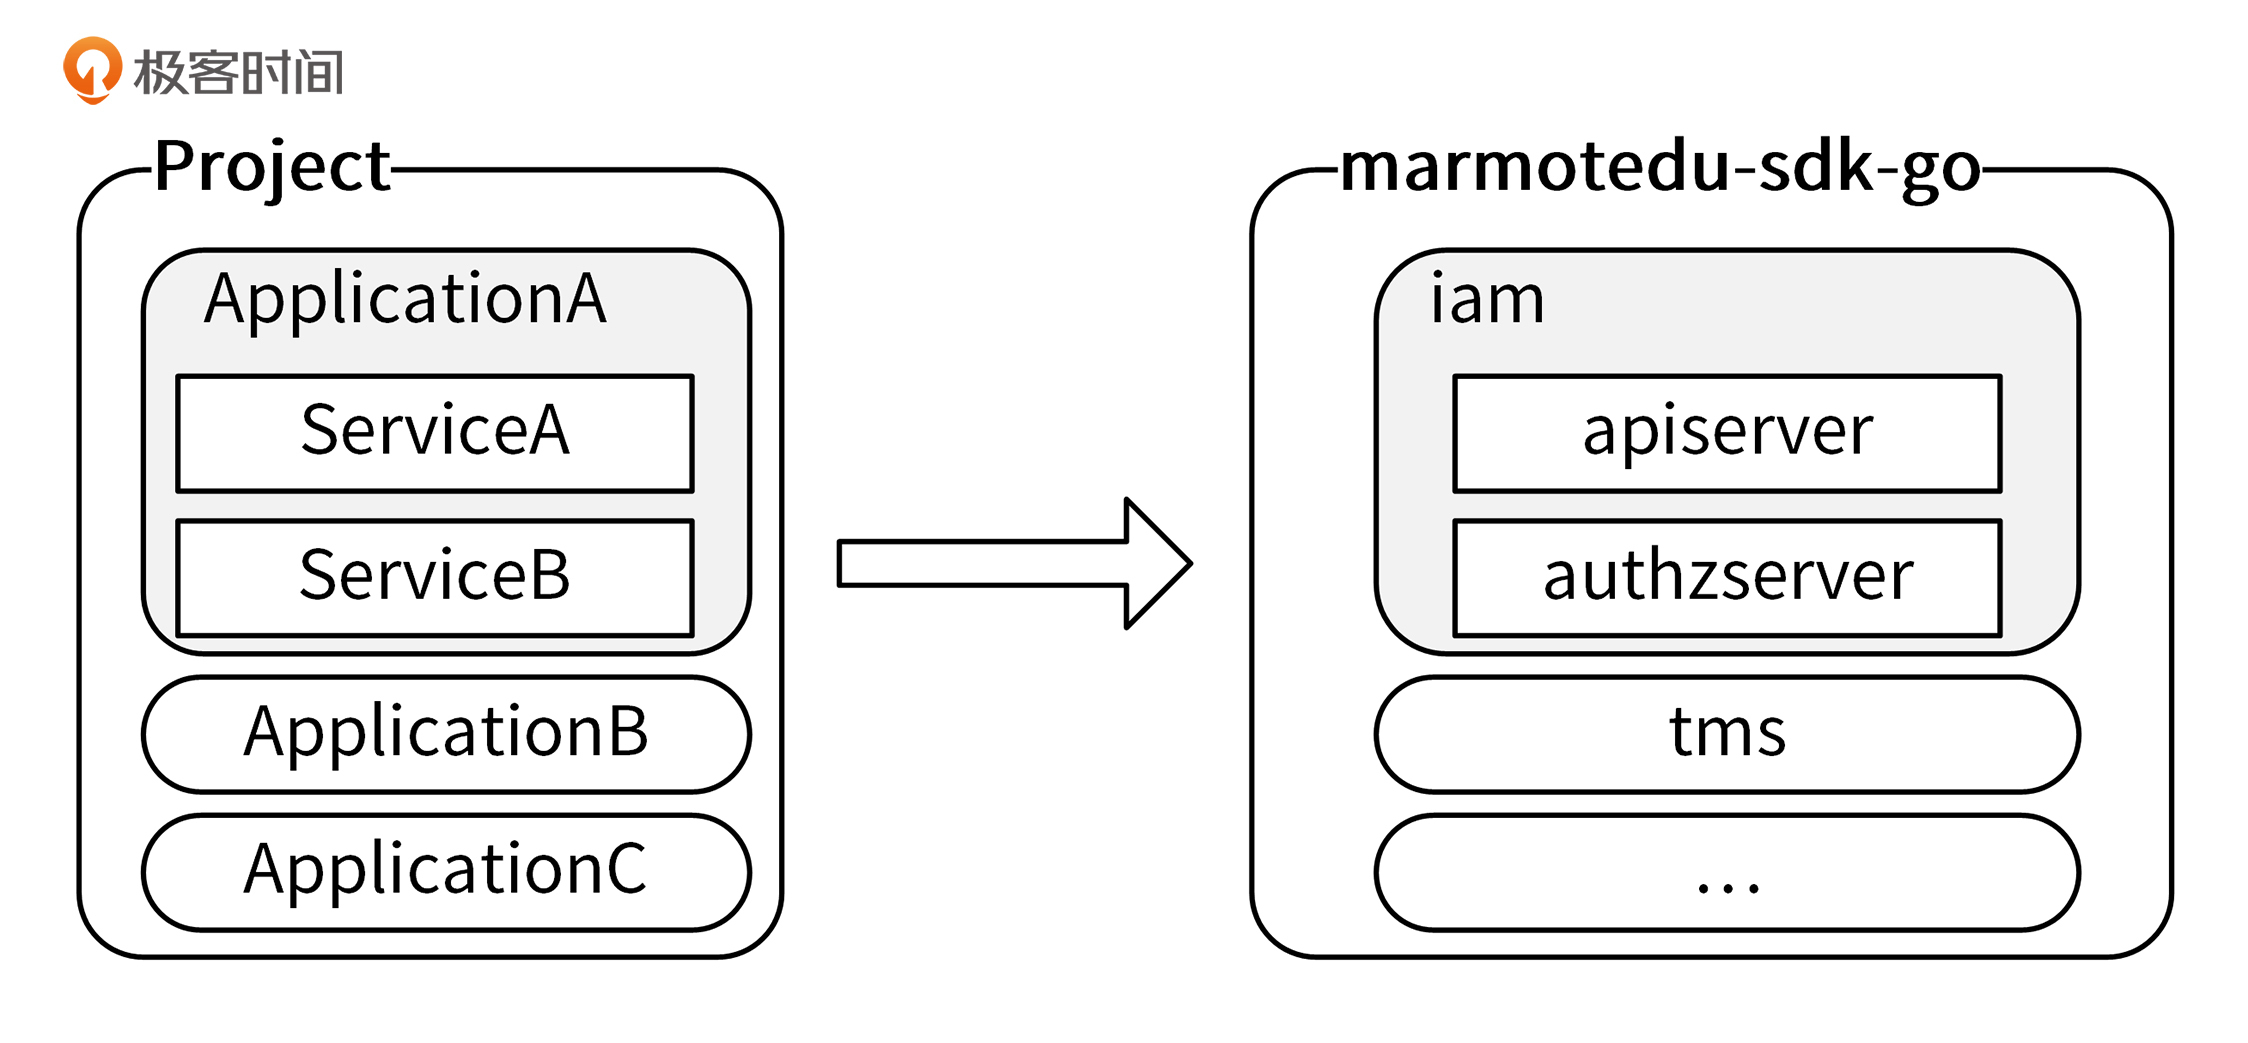
marmotedu-sdk-go 定义了 3 类接口,分别代表了项目、应用和服务级别的 API 接口:
// 项目级别的接口
type Interface interface {
    Iam() iam.IamInterface
    Tms() tms.TmsInterface
}

// 应用级别的接口
type IamInterface interface {
    APIV1() apiv1.APIV1Interface
    AuthzV1() authzv1.AuthzV1Interface
}

// 服务级别的接口
type APIV1Interface interface {
    RESTClient() rest.Interface
    SecretsGetter
    UsersGetter
    PoliciesGetter
}

// 资源级别的客户端
type SecretsGetter interface {
    Secrets() SecretInterface
}

// 资源的接口定义
type SecretInterface interface {
    Create(ctx context.Context, secret *v1.Secret, opts metav1.CreateOptions) (*v1.Secret, error)
    Update(ctx context.Context, secret *v1.Secret, opts metav1.UpdateOptions) (*v1.Secret, error)
    Delete(ctx context.Context, name string, opts metav1.DeleteOptions) error
    DeleteCollection(ctx context.Context, opts metav1.DeleteOptions, listOpts metav1.ListOptions) error
    Get(ctx context.Context, name string, opts metav1.GetOptions) (*v1.Secret, error)
    List(ctx context.Context, opts metav1.ListOptions) (*v1.SecretList, error)
    SecretExpansion
}Interface 代表了项目级别的接口,里面包含了 Iam 和 Tms 两个应用; IamInterface 代表了应用级别的接口,里面包含了 api(iam-apiserver)和 authz(iam-authz-server)两个服务级别的接口。api 和 authz 服务中,又包含了各自服务中 REST 资源的 CURD 接口。
marmotedu-sdk-go 通过 XxxV1 这种命名方式来支持不同版本的 API 接口,好处是可以在程序中同时调用同一个 API 接口的不同版本,例如:
clientset.Iam().AuthzV1().Authz().Authorize() 、clientset.Iam().AuthzV2().Authz().Authorize() 分别调用了 /v1/authz 和 /v2/authz 两个版本的 API 接口。
上述关系也可以从目录结构中反映出来,marmotedu-sdk-go 目录设计如下(只列出了一些重要的文件):
├── examples                        # 存放SDK的使用示例
├── Makefile                        # 管理SDK源码,静态代码检查、代码格式化、测试、添加版权信息等
├── marmotedu
│   ├── clientset.go                # clientset实现,clientset中包含多个应用,多个服务的API接口
│   ├── fake                        # clientset的fake实现,主要用于单元测试
│   └── service                     # 按应用进行分类,存放应用中各服务API接口的具体实现
│       ├── iam                     # iam应用的API接口实现,包含多个服务
│       │   ├── apiserver           # iam应用中,apiserver服务的API接口,包含多个版本
│       │   │   └── v1              # apiserver v1版本API接口
│       │   ├── authz               # iam应用中,authz服务的API接口
│       │   │   └── v1              # authz服务v1版本接口
│       │   └── iam_client.go       # iam应用的客户端,包含了apiserver和authz 2个服务的客户端
│       └── tms                     # tms应用的API接口实现
├── pkg                             # 存放一些共享包,可对外暴露
├── rest                            # HTTP请求的底层实现
├── third_party                     # 存放修改过的第三方包,例如:gorequest
└── tools
└── clientcmd # 一些函数用来帮助创建rest.Config配置每种类型的客户端,都可以通过以下相似的方式来创建:
config, err := clientcmd.BuildConfigFromFlags("", "/root/.iam/config")
clientset, err := xxxx.NewForConfig(config)/root/.iam/config 为配置文件,里面包含了服务的地址和认证信息。BuildConfigFromFlags 函数加载配置文件,创建并返回 rest.Config 类型的配置变量,并通过 xxxx.NewForConfig 函数创建需要的客户端。xxxx 是所在层级的 client 包,例如 iam、tms。
marmotedu-sdk-go 客户端定义了 3 类接口,这可以带来两个好处。
第一,API 接口调用格式规范,层次清晰,可以使 API 接口调用更加清晰易记。
第二,可以根据需要,自行选择客户端类型,调用灵活。举个例子,在 A 服务中需要同时用到 iam-apiserver 和 iam-authz-server 提供的接口,就可以创建应用级别的客户端 IamClient,然后通过 iamclient.APIV1() 和 iamclient.AuthzV1() ,来切换调用不同服务的 API 接口。
接下来,我们来看看如何创建三个不同级别的客户端。
项目级别客户端创建
Interface 对应的客户端实现为Clientset,所在的包为 marmotedu-sdk-go/marmotedu,Clientset 客户端的创建方式为:
config, err := clientcmd.BuildConfigFromFlags("", "/root/.iam/config")
clientset, err := marmotedu.NewForConfig(config)调用方式为 clientset.应用.服务.资源名.接口 ,例如:
rsp, err := clientset.Iam().AuthzV1().Authz().Authorize()参考示例为 marmotedu-sdk-go/examples/authz_clientset/main.go。
应用级别客户端创建
IamInterface 对应的客户端实现为IamClient,所在的包为 marmotedu-sdk-go/marmotedu/service/iam,IamClient 客户端的创建方式为:
config, err := clientcmd.BuildConfigFromFlags("", "/root/.iam/config")
iamclient,, err := iam.NewForConfig(config)调用方式为 iamclient.服务.资源名.接口 ,例如:
rsp, err := iamclient.AuthzV1().Authz().Authorize()参考示例为 marmotedu-sdk-go/examples/authz_iam/main.go。
服务级别客户端创建
AuthzV1Interface 对应的客户端实现为AuthzV1Client,所在的包为 marmotedu-sdk-go/marmotedu/service/iam/authz/v1,AuthzV1Client 客户端的创建方式为:
config, err := clientcmd.BuildConfigFromFlags("", "/root/.iam/config")
client, err := v1.NewForConfig(config)调用方式为 client.资源名.接口 ,例如:
rsp, err := client.Authz().Authorize()参考示例为 marmotedu-sdk-go/examples/authz/main.go。
上面我介绍了 marmotedu-sdk-go 的客户端创建方法,接下来我们再来看下,这些客户端具体是如何执行 REST API 请求的。
marmotedu-sdk-go 的实现
marmotedu-sdk-go 的实现和 medu-sdk-go 一样,也是采用分层结构,分为 API 层和基础层。如下图所示:

RESTClient是整个 SDK 的核心,RESTClient 向下通过调用Request模块,来完成 HTTP 请求方法、请求路径、请求体、认证信息的构建。Request 模块最终通过调用gorequest包提供的方法,完成 HTTP 的 POST、PUT、GET、DELETE 等请求,获取 HTTP 返回结果,并解析到指定的结构体中。RESTClient 向上提供 Post() 、 Put() 、 Get() 、 Delete() 等方法来供客户端完成 HTTP 请求。
marmotedu-sdk-go 提供了两类客户端,分别是 RESTClient 客户端和基于 RESTClient 封装的客户端。
- RESTClient:Raw 类型的客户端,可以通过指定 HTTP 的请求方法、请求路径、请求参数等信息,直接发送 HTTP 请求,例如
client.Get().AbsPath("/version").Do().Into()。 - 基于 RESTClient 封装的客户端:例如 AuthzV1Client、APIV1Client 等,执行特定 REST 资源、特定 API 接口的请求,方便开发者调用。
接下来,我们具体看下如何创建 RESTClient 客户端,以及 Request 模块的实现。
RESTClient 客户端实现
我通过下面两个步骤,实现了 RESTClient 客户端。
第一步,创建rest.Config类型的变量。
BuildConfigFromFlags函数通过加载 yaml 格式的配置文件,来创建 rest.Config 类型的变量,加载的 yaml 格式配置文件内容为:
apiVersion: v1
user:
  #token: # JWT Token
  username: admin # iam 用户名
  password: Admin@2020 # iam 密码
  #secret-id: # 密钥 ID
  #secret-key: # 密钥 Key
  client-certificate: /home/colin/.iam/cert/admin.pem # 用于 TLS 的客户端证书文件路径
  client-key: /home/colin/.iam/cert/admin-key.pem # 用于 TLS 的客户端 key 文件路径
  #client-certificate-data:
  #client-key-data:

server:
  address: https://127.0.0.1:8443 # iam api-server 地址
  timeout: 10s # 请求 api-server 超时时间
  #max-retries: # 最大重试次数,默认为 0
  #retry-interval: # 重试间隔,默认为 1s
  #tls-server-name: # TLS 服务器名称
  #insecure-skip-tls-verify: # 设置为 true 表示跳过 TLS 安全验证模式,将使得 HTTPS 连接不安全
  certificate-authority: /home/colin/.iam/cert/ca.pem # 用于 CA 授权的 cert 文件路径
#certificate-authority-data:在配置文件中,我们可以指定服务的地址、用户名/密码、密钥、TLS 证书、超时时间、重试次数等信息。
创建方法如下:
config, err := clientcmd.BuildConfigFromFlags("", *iamconfig)
if err != nil {
    panic(err.Error())
}这里的代码中,*iamconfig 是 yaml 格式的配置文件路径。BuildConfigFromFlags 函数中,调用LoadFromFile函数来解析 yaml 配置文件。LoadFromFile 最终是通过 yaml.Unmarshal 的方式来解析 yaml 格式的配置文件的。
第二步,根据 rest.Config 类型的变量,创建 RESTClient 客户端。
通过RESTClientFor函数来创建 RESTClient 客户端:
func RESTClientFor(config *Config) (*RESTClient, error) {
    ...
    baseURL, versionedAPIPath, err := defaultServerURLFor(config)
    if err != nil {
        return nil, err
    }

    // Get the TLS options for this client config
    tlsConfig, err := TLSConfigFor(config)
    if err != nil {
        return nil, err
    }

    // Only retry when get a server side error.
    client := gorequest.New().TLSClientConfig(tlsConfig).Timeout(config.Timeout).
        Retry(config.MaxRetries, config.RetryInterval, http.StatusInternalServerError)
    // NOTICE: must set DoNotClearSuperAgent to true, or the client will clean header befor http.Do
    client.DoNotClearSuperAgent = true

    ...

    clientContent := ClientContentConfig{
        Username:           config.Username,
        Password:           config.Password,
        SecretID:           config.SecretID,
        SecretKey:          config.SecretKey,
        ...
    }

    return NewRESTClient(baseURL, versionedAPIPath, clientContent, client)
}RESTClientFor 函数调用defaultServerURLFor(config)生成基本的 HTTP 请求路径:baseURL=http://127.0.0.1:8080,versionedAPIPath=/v1。然后,通过TLSConfigFor函数生成TLS配置,并调用 gorequest.New() 创建 gorequest 客户端,将客户端配置信息保存在变量中。最后,调用NewRESTClient函数创建 RESTClient 客户端。
RESTClient 客户端提供了以下方法,来供调用者完成 HTTP 请求:
func (c *RESTClient) APIVersion() scheme.GroupVersion
func (c *RESTClient) Delete() *Request
func (c *RESTClient) Get() *Request
func (c *RESTClient) Post() *Request
func (c *RESTClient) Put() *Request
func (c *RESTClient) Verb(verb string) *Request可以看到,RESTClient 提供了 Delete 、 Get 、 Post 、 Put 方法,分别用来执行 HTTP 的 DELETE、GET、POST、PUT 方法,提供的 Verb 方法可以灵活地指定 HTTP 方法。这些方法都返回了 Request 类型的变量。Request 类型的变量提供了一些方法,用来完成具体的 HTTP 请求,例如:
  type Response struct {
    Allowed bool   `json:"allowed"`
    Denied  bool   `json:"denied,omitempty"`
    Reason  string `json:"reason,omitempty"`
    Error   string `json:"error,omitempty"`
}

func (c *authz) Authorize(ctx context.Context, request *ladon.Request, opts metav1.AuthorizeOptions) (result *Response, err error) {
    result = &Response{}
    err = c.client.Post().
        Resource("authz").
        VersionedParams(opts).
        Body(request).
        Do(ctx).
        Into(result)

    return
}上面的代码中, c.client 是 RESTClient 客户端,通过调用 RESTClient 客户端的 Post 方法,返回了 *Request 类型的变量。
*Request 类型的变量提供了 Resource 和 VersionedParams 方法,来构建请求 HTTP URL 中的路径 /v1/authz ;通过 Body 方法,指定了 HTTP 请求的 Body。
到这里,我们分别构建了 HTTP 请求需要的参数:HTTP Method、请求 URL、请求 Body。所以,之后就可以调用 Do 方法来执行 HTTP 请求,并将返回结果通过 Into 方法保存在传入的 result 变量中。
Request 模块实现
RESTClient 客户端的方法会返回 Request 类型的变量,Request 类型的变量提供了一系列的方法用来构建 HTTP 请求参数,并执行 HTTP 请求。
所以,Request 模块可以理解为最底层的通信层,我们来看下 Request 模块具体是如何完成 HTTP 请求的。
我们先来看下Request 结构体的定义:
type RESTClient struct {
    // base is the root URL for all invocations of the client
    base *url.URL
    // group stand for the client group, eg: iam.api, iam.authz
    group string
    // versionedAPIPath is a path segment connecting the base URL to the resource root
    versionedAPIPath string
    // content describes how a RESTClient encodes and decodes responses.
    content ClientContentConfig
    Client  *gorequest.SuperAgent
}

type Request struct {
	c *RESTClient

	timeout time.Duration

	// generic components accessible via method setters
	verb       string
	pathPrefix string
	subpath    string
	params     url.Values
	headers    http.Header

	// structural elements of the request that are part of the IAM API conventions
	// namespace    string
	// namespaceSet bool
	resource     string
	resourceName string
	subresource  string

	// output
	err  error
	body interface{}
}再来看下 Request 结构体提供的方法:
func (r *Request) AbsPath(segments ...string) *Request
func (r *Request) Body(obj interface{}) *Request
func (r *Request) Do(ctx context.Context) Result
func (r *Request) Name(resourceName string) *Request
func (r *Request) Param(paramName, s string) *Request
func (r *Request) Prefix(segments ...string) *Request
func (r *Request) RequestURI(uri string) *Request
func (r *Request) Resource(resource string) *Request
func (r *Request) SetHeader(key string, values ...string) *Request
func (r *Request) SubResource(subresources ...string) *Request
func (r *Request) Suffix(segments ...string) *Request
func (r *Request) Timeout(d time.Duration) *Request
func (r *Request) URL() *url.URL
func (r *Request) Verb(verb string) *Request
func (r *Request) VersionedParams(v interface{}) *Request通过 Request 结构体的定义和使用方法,我们不难猜测出:Request 模块通过 Name 、 Resource 、 Body 、 SetHeader 等方法来设置 Request 结构体中的各个字段。这些字段最终用来构建出一个 HTTP 请求,并通过 Do 方法来执行 HTTP 请求。
那么,如何构建并执行一个 HTTP 请求呢?我们可以通过以下 5 步,来构建并执行 HTTP 请求:
- 构建 HTTP URL;
- 构建 HTTP Method;
- 构建 HTTP Body;
- 执行 HTTP 请求;
- 保存 HTTP 返回结果。
接下来,我们就来具体看下 Request 模块是如何构建这些请求参数,并发送 HTTP 请求的。
第一步,构建 HTTP URL。
首先,通过defaultServerURLFor函数返回了http://iam.api.marmotedu.com:8080 和 /v1 ,并将二者分别保存在了 Request 类型结构体变量中 c 字段的 base 字段和 versionedAPIPath 字段中。
通过 Do 方法执行 HTTP 时,会调用r.URL()方法来构建请求 URL。 r.URL 方法中,通过以下代码段构建了 HTTP 请求 URL:
func (r *Request) URL() *url.URL {
    p := r.pathPrefix
    if len(r.resource) != 0 {
        p = path.Join(p, strings.ToLower(r.resource))
    }

    if len(r.resourceName) != 0 || len(r.subpath) != 0 || len(r.subresource) != 0 {
        p = path.Join(p, r.resourceName, r.subresource, r.subpath)
    }

    finalURL := &url.URL{}
    if r.c.base != nil {
        *finalURL = *r.c.bas
    }

    finalURL.Path = p
    ...
}p := r.pathPrefix 和 r.c.base ,是通过 defaultServerURLFor 调用返回的 v1 和 http://iam.api.marmotedu.com:8080 来构建的。
resourceName 通过 func (r *Request) Resource(resource string) *Request 来指定,例如 authz 。
所以,最终我们构建的请求 URL 为 http://iam.api.marmotedu.com:8080/v1/authz 。
第二步,构建 HTTP Method。
HTTP Method 通过 RESTClient 提供的 Post 、Delete 、Get 等方法来设置,例如:
func (c *RESTClient) Post() *Request {
    return c.Verb("POST")
}

func (c *RESTClient) Verb(verb string) *Request {
    return NewRequest(c).Verb(verb)
}NewRequest(c).Verb(verb) 最终设置了 Request 结构体的 verb 字段,供 Do 方法使用。
第三步,构建 HTTP Body。
HTTP Body 通过 Request 结构体提供的 Body 方法来指定:
func (r *Request) Body(obj interface{}) *Request {
    if v := reflect.ValueOf(obj); v.Kind() == reflect.Struct {
        r.SetHeader("Content-Type", r.c.content.ContentType)
    }

    r.body = obj

    return r
}第四步,执行 HTTP 请求。
通过 Request 结构体提供的 Do 方法来执行具体的 HTTP 请求,代码如下:
func (r *Request) Do(ctx context.Context) Result {
	client := r.c.Client
	client.Header = r.headers

	if r.timeout > 0 {
		var cancel context.CancelFunc
		ctx, cancel = context.WithTimeout(ctx, r.timeout)

		defer cancel()
	}

	client.WithContext(ctx)

	resp, body, errs := client.CustomMethod(r.verb, r.URL().String()).Send(r.body).EndBytes()
	if err := combineErr(resp, body, errs); err != nil {
		return Result{
			response: &resp,
			err:      err,
			body:     body,
		}
	}

	decoder, err := r.c.content.Negotiator.Decoder()
	if err != nil {
		return Result{
			response: &resp,
			err:      err,
			body:     body,
			decoder:  decoder,
		}
	}

	return Result{
		response: &resp,
		body:     body,
		decoder:  decoder,
	}
}在 Do 方法中,使用了 Request 结构体变量中各个字段的值,通过 client.CustomMethod 来执行 HTTP 请求。 client 是 *gorequest.SuperAgent 类型的客户端。
第五步,保存 HTTP 返回结果。
通过 Request 结构体的 Into 方法来保存 HTTP 返回结果:
func (r Result) Into(v interface{}) error {
    if r.err != nil {
        return r.Error()
    }

    if r.decoder == nil {
        return fmt.Errorf("serializer doesn't exist")
    }

    if err := r.decoder.Decode(r.body, &v); err != nil {
        return err
    }

    return nil
}r.body 是在 Do 方法中,执行完 HTTP 请求后设置的,它的值为 HTTP 请求返回的 Body。
请求认证
接下来,我再来介绍下 marmotedu-sdk-go 另外一个比较核心的功能:请求认证。
marmotedu-sdk-go 支持两种认证方式:
- Basic 认证:通过给请求添加
Authorization: Basic xxxx来实现。 - Bearer 认证:通过给请求添加
Authorization: Bearer xxxx来实现。这种方式又支持直接指定 JWT Token,或者通过指定密钥对由 SDK 自动生成 JWT Token。
Basic 认证和 Bearer 认证,我在 25 讲介绍过,你可以返回查看下。
认证头是 RESTClient 客户端发送 HTTP 请求时指定的,具体实现位于NewRequest函数中:
switch {
    case c.content.HasTokenAuth():
        r.SetHeader("Authorization", fmt.Sprintf("Bearer %s", c.content.BearerToken))
    case c.content.HasKeyAuth():
        tokenString := auth.Sign(c.content.SecretID, c.content.SecretKey, "marmotedu-sdk-go", c.group+".marmotedu.com")
        r.SetHeader("Authorization", fmt.Sprintf("Bearer %s", tokenString))
    case c.content.HasBasicAuth():
        // TODO: get token and set header
        r.SetHeader("Authorization", "Basic "+basicAuth(c.content.Username, c.content.Password))
}上面的代码会根据配置信息,自动判断使用哪种认证方式。
总结
这一讲中,我介绍了 Kubernetes client-go 风格的 SDK 实现方式。和公有云厂商的 SDK 设计相比,client-go 风格的 SDK 设计有很多优点。
marmotedu-sdk-go 在设计时,通过接口实现了 3 类客户端,分别是项目级别的客户端、应用级别的客户端和服务级别的客户端。开发人员可以根据需要,自行创建客户端类型。
marmotedu-sdk-go 通过RESTClientFor,创建了 RESTClient 类型的客户端,RESTClient 向下通过调用Request模块,来完成 HTTP 请求方法、请求路径、请求体、认证信息的构建。Request 模块最终通过调用gorequest包提供的方法,完成 HTTP 的 POST、PUT、GET、DELETE 等请求,获取 HTTP 返回结果,并解析到指定的结构体中。RESTClient 向上提供 Post() 、 Put() 、 Get() 、 Delete() 等方法,来供客户端完成 HTTP 请求。
课后练习
- 阅读defaultServerURLFor源码,思考下 defaultServerURLFor 是如何构建请求地址
http://iam.api.marmotedu.com:8080和 API 版本/v1的。 - 使用gorequest包,编写一个可以执行以下 HTTP 请求的示例:
curl -XPOST http://example.com/v1/user -d '{"username":"colin","address":"shenzhen"}'欢迎你在留言区与我交流讨论,我们下一讲见。